A delicious meal for days to come.
I think a whole roasted chicken can be intimidating. It can be kind of fancy. Motivation to make your own roast chicken might be low because nearly every grocery store has hot rotisserie chickens ready to go, and those little hens have their place, don’t get me wrong. However, a homemade roast chicken can be delicious, affordable, and feed the whole family with minimal effort. It’s the kind of dinner that takes a home cook’s status from novice to intermediate. But, I also think roasted chicken is a great beginner recipe to learn because it sets the foundation for more complicated cooking. As if that wasn’t enough, they can take on different flavors every time you make it, so it never gets old. It’s actually a very simple cooking process and time saver for a busy week. Let’s demystify the whole chicken and feed your family for days to come.
I first started buying whole chickens just for the bones to make chicken stock. The wings and back have loads of gelatin in the joints that make for a super special secret ingredient when cooking soups and sauces. Then I learned to appreciate the breasts and tenders still on the bone and the thighs and drumsticks are great for quick weeknight meals. I almost always cook two birds at once because as long as I’m making a mess in the kitchen and going through the motions, I may as well double down. Then I have enough for a dinner that evening, leftovers for lunches, and another dinner later in the week. Leftovers get turned into chicken salad sandwiches, tacos, chicken noodle soup, added to creamy parmesan risotto, and on and on. Not to mention the bones and meat that make incredible chicken stock. I’m not sure there’s anything a whole chicken can’t do.
As usual, this is a two-day process assuming we have the time. So, let’s dig in and get these ladies ready…
Supples:
-
sheet pan with wire rack
-
large cutting board
-
gloves
-
knife
-
kitchen string
-
paper towels
-
salt
Get your workspace ready and roll up your sleeves. Lay out your supplies, put on your gloves, and make sure your sink is empty. I cut these girls out of their wrappers in the sick because there is a lot of liquid in the packaging. Follow along to get them prepped from here:
-
Cut Henny out of the packaging. Let excess liquid drain out in sink.
-
Pat her dry and lay her on your cutting board. Trim off any extra skin and discard.
-
Gently loosen the skin, without tearing it as much as possible all the way around the body.
-
As you pull the skin up, sprinkle salt and massage in to season the meat as evenly as possible. Do your best to get salt on the thighs and legs as well. Then lightly salt the outside of the bird as well.
-
Fold the wings back behind and tuck in so they are tight against the back. Pull the legs together and tie them with kitchen string.
-
Repeat with Penny.
-
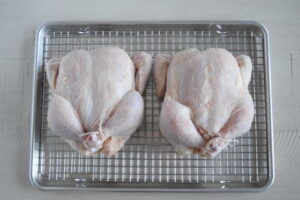
Place sheet pan with both chickens in the fridge, uncovered, over night.


Notice the change in color and texture from day 1 to day 2? The skin has dried out and liquid has been pulled. The meat is well seasoned all the way through. Now, we can get them buttered, spiced, and in to the oven. Henny, pictured on the left, is getting a spice blend from Penzeys called Tuscan Sunset which includes basil, oregano, red bell pepper, garlic, thyme, fennel, black pepper, and anise. Penny, on the right, is getting a lemon pepper blend with parsley and lemon zest.
Use the bones leftover to make chicken stock. Follow my recipe here and skip the browning step since the meat and bones are already cooked. Note that stock made from these bones will also have salt on them, so make sure not to add anymore until it’s fully reduced.
Simple Roast Chicken
Equipment
- sheet pan with wire rack
- large cutting board
- gloves
- knife
- kitchen string
- paper towels
- salt
Ingredients
- 2 whole chickens
- 2 tablespoon salt
- ¼ cup butter
Instructions
- Get your workspace ready and roll up your sleeves. Lay out your supplies, put on your gloves, and make sure your sink is empty. I cut these girls out of their wrappers in the sick because there is a lot of liquid in the packaging. Follow along to get them prepped from here:
- Cut Henny out of the packaging. Let excess liquid drain out in sink.
- Pat her dry and lay her on your cutting board. Trim off any extra skin and discard.
- Gently loosen the skin, without tearing it as much as possible all the way around the body.
- As you pull the skin up, sprinkle salt and massage in to season the meat as evenly as possible. Do your best to get salt on the thighs and legs as well. Then lightly salt the outside of the bird as well.
- Fold the wings back behind and tuck in so they are tight against the back. Pull the legs together and tie them with kitchen string.
- Repeat with Penny.
- Place sheet pan with both chickens in the fridge, uncovered, over night.
Roasting the birds
- Preheat oven to 375F
- Mix together 3 tablespoons of butter with each spice mixture.
- Untie the legs of each chicken and spread ⅔ of butter mixture under the skin. Rub around and spread as evenly as possible. (Room temp butter helps here). Rub the rest on the outside coating the whole bird evenly. Tie legs back together.
- Pop these girls in the oven for 25 minutes.
- Rotate sheet pan for more even browning and set the timer for 25 minutes again. Check their temp with a thermometer in both the breast and thigh. They need to reach 165.
- Once they’ve reached temp, pull them out and tent with foil to rest while you assemble the rest of your dinner.
- Carve them up and dig in!
Notes
Use the bones leftover to make chicken stock. Follow my recipe here and skip the browning step since the meat and bones are already cooked. Note that stock made from these bones will also have salt on them, so make sure not to add anymore until it’s fully reduced.





Leave a Reply